Prerequisites
You'll need two servers, the one that you want to monitor, and the one that will be notified when the first one is down.
In this short tutorial, I'm using DigitalOcean servers and UptimeRobot to monitor, but it will work the same way if you use something else, as long as you have API access to your server and a webhook feature for the monitoring.
DigitalOcean API token
Go to your API page and create a new token.
UptimeRobot webhook
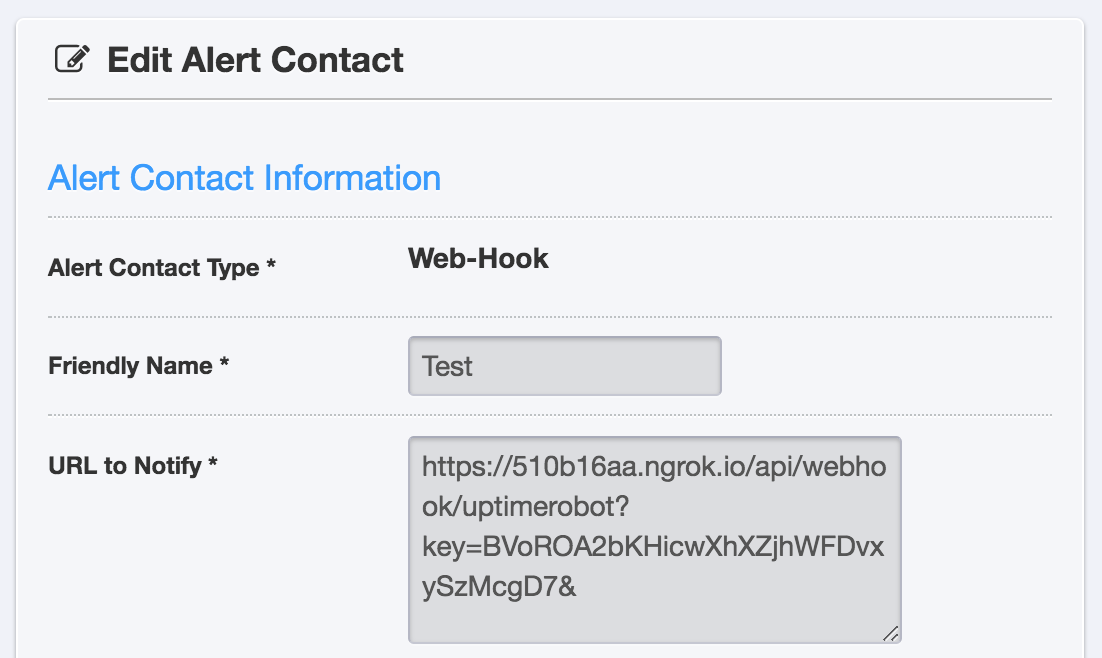
Go to your settings and create a new contact. Select the type "Web-Hook".
I'm using ngrok to test this on local. The endpoint I chose is /api/webhook/uptimerobot and I've added a custom key parameter that will help to verify the origin. UptimeRobot will automatically add all the parameters at the end of this URL, so make sure to end it with a &.

Add this contact to your monitor(s) and you're done.
Laravel configuration
I'm creating a fresh Laravel 5.7 application but it can be easily implemented into any existing app.
'Rebooter' being the (poorly chosen) name of my demo app, here are the basic commands to create an 'up and running' Laravel application:
$ laravel new rebooter
$ cd rebooter
$ php artisan key:generate
We're going to use the DigitalOcean package from Graham Campbell to use the API.
$ composer require graham-campbell/digitalocean guzzlehttp/guzzle
Publish the configuration file and update it to add your environment variable:
$ php artisan vendor:publish
// config/digitalocean.php

<?php

// ...

'connections' => [

    'main' => [
        'driver'  => 'guzzlehttp',
        'token'   => env('DIGITAL_OCEAN_TOKEN'),
    ],

],
Open you .env file and add your DigitalOcean token and your UptimeRobot key
DIGITAL_OCEAN_TOKEN="ABCDEFGHIJKLMNOPQRSTUVWXYZ"
UPTIME_ROBOT_KEY="ABCDEFGHIJKLMNOPQRSTUVWXYZ"
UptimeRobot will send you the name of your monitor, while DigitalOcean wants your server ID, so we'll have to find a way to make these two work.
You could add your server ID as a custom parameter in the UptimeRobot webhook, or you could create a correspondence table.
I'm choosing the latter and I'm creating a config file with the list of my servers.
// config/servers.php

<?php

return [

    // UptimeRobot monitor's name => DigitalOcean server ID
    'Your-server-name' => 12345678,

];
Create a route in your api.php file to catch the webhook call:
// routes/api.php

<?php

Route::get('webhook/uptimerobot', 'UptimeRobotController@webhook');
Create your controller:
$ php artisan make:controller UptimeRobotController
<?php

namespace App\Http\Controllers;

use Illuminate\Http\Request;
use Illuminate\Validation\Rule;
use GrahamCampbell\DigitalOcean\Facades\DigitalOcean;

class UptimeRobotController extends Controller
{
    public function webhook(Request $request)
    {
        $request->validate([
            'key' => 'required|string',
            'alertTypeFriendlyName' => 'required|string',
            'monitorFriendlyName' => [
                'required',
                Rule::in(collect(config('servers'))->keys()),
            ],
        ]);

        abort_if($request->key != env('UPTIME_ROBOT_KEY'), 403);

        if ($request->alertTypeFriendlyName == 'Down') {
            DigitalOcean::droplet()->reboot(config("servers.{$request->monitorFriendlyName}"));
        }
    }
}
We have a few validations at the top to make sure all the variables exist, then we verify the key from UptimeRobot and if the alert type is 'Down', we reboot our server.
That's it, really simple right?
Now everytime your server is down, DigitalOcean will reboot it for you.
The full source code is available on GitHub.